Do you feel like you need to get a massage once a week but can’t afford it? Then it’s time to grab a foam roller and perform this 20-minute routine!
Regardless of what job or type of exercise you do, almost all of us have some sort of routine that causes us to repeat the same movements over and over again. Repetitive movements lead to knots and muscle imbalances, resulting in muscle tightness, loss of mobility, and feelings of pain and discomfort.
How Foam Rolling Increases Mobility
Foam rolling is a form of self-myofascial release – also known as SMR – and acts like a deep tissue massage on the body. SMR works to massage out knots, or trigger points, in the muscle fascia and improves blood flow to the muscle. (1)
Suffering from a sore neck, back and shoulders? Get our mobility guide to ease pain and soreness.
Get The FREE Mobility Guide To Fix Your Pain Today!
Studies have shown that foam rolling increases range of motion and mobility. One study even showed an improvement of knee flexion by up to 20 degrees. (2)
By increasing your mobility, you will find that you have better posture, less pain, and higher performance and recovery when it comes to daily activities and exercise. (3)
How to Foam Roll
- Apply moderate pressure to the muscle that you are foam rolling.
- Roll slowly around the areas of direct pain to help you to find trigger points.
- Once you find a knot, hold for 20 seconds or until you feel a release of the pain, and then continue on until you find the next one. You may experience intensity of pain before the release.
- Never foam roll over your joints. Stop immediately if something doesn’t feel right or the pain feels like too much. Always listen to your body.
- Expect soreness the next day, just as if you had a deep tissue massage.
- Keep a consistent foam rolling schedule.
Use this 20-minute foam rolling routine to increase mobility throughout your entire body.
Spend two minutes on each body part, and then continue onto the next. Start by using this routine three times per week, and gradually increase over time.
20-Minute Total Body Foam Rolling Routine
Calves | 2 minutes
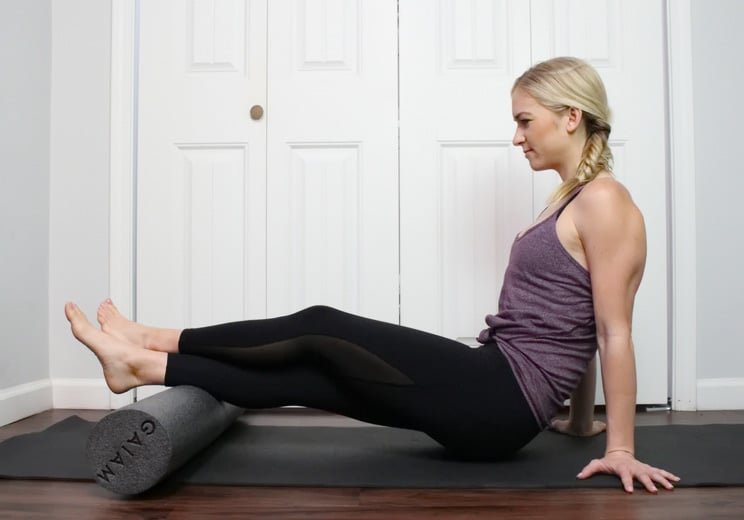
Many people have tight calves from wearing improper or uncomfortable shoes, walking uphill, or climbing steps. Tightness in the calf muscles can cause imbalances up the kinetic chain, leading first to pain in the feet and ankles, then the knees, and eventually up to the hips and back.
- Start by sitting on the floor with a foam roller in front of you. Place your right leg on top of the foam roller so that it rests right above your right ankle.
- Put both hands on the ground behind your hips and lean back slightly into your palms. Cross your left ankle on top of your right to apply pressure onto your right calf.
- Press into your palms to lift your hips up off the ground slightly, and very slowly begin to roll towards your knee. Stop whenever you find a knot and hold. You can place your hips back on the ground and roll your calf side to side. Once you feel a release, continue rolling until you reach just below the knee.
- Roll for about one minute, then switch to your left leg.
Hamstrings | 2 minutes
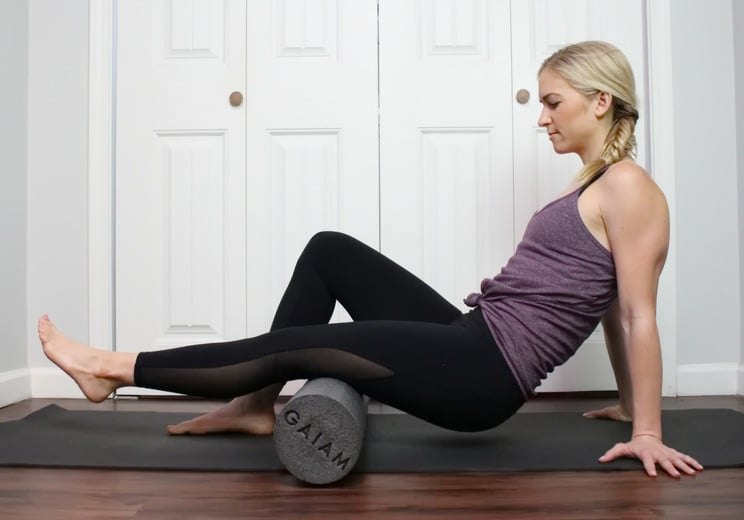
Sitting and running can both put the hamstrings in a constant shortened position, causing them to be stiff and tight. Tight hamstrings can lead to pain in the knees, hips, and lower back.
- Begin sitting on the floor with a foam roller in front of you. Place your right leg on top of the foam roller so that it rests right above your right knee.
- Put both hands on the ground behind you and lean back slightly into your palms. Cross your left ankle over your right to apply pressure onto your right hamstrings.
- Press into your palms to lift your hips up off the ground and very slowly begin to roll towards your glutes. Stop when you find a tender spot and hold for 20 seconds, or until you feel a release. Then, continue rolling up until you reach right below the glutes.
- Roll for about one minute, then switch to your left leg.
Quadriceps | 2 minutes
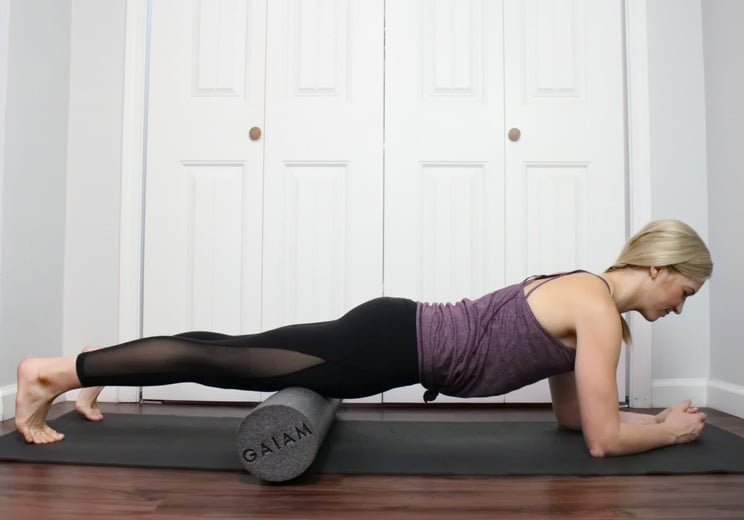
If you lead an active life and find yourself repeating motions like squats or running up an incline, you may find yourself with tight quads. Tight quadriceps can cause tightness and pain in the knees, hip flexors, lower back, and glutes.
- Start by lying face down on your foam roller so that it goes perpendicular across your body. Position it so that it rests right below your hip bones.
- Place your forearms on the ground to control the amount of weight you’re placing on your quads. Then slowly roll yourself up the foam roller so that it rolls down towards your knees.
- Stop and hold whenever you feel a trigger point. Once you get to right above the knees, roll back up to the starting position.
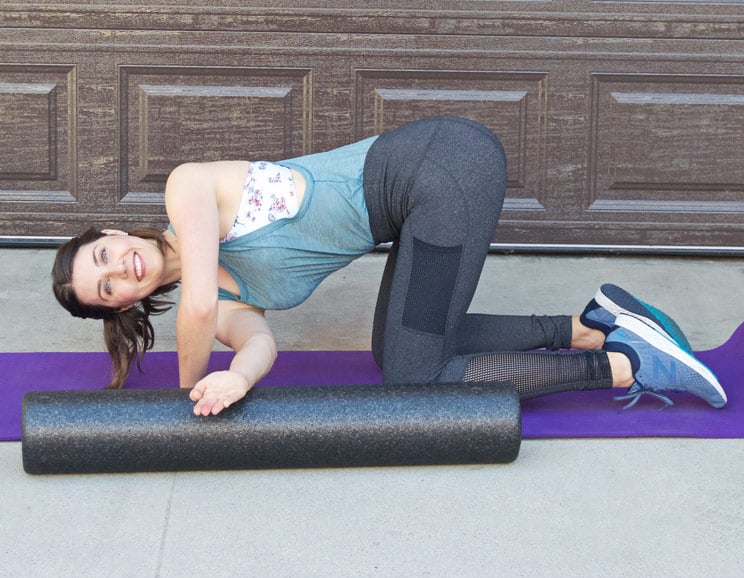
Adductors | 2 minutes
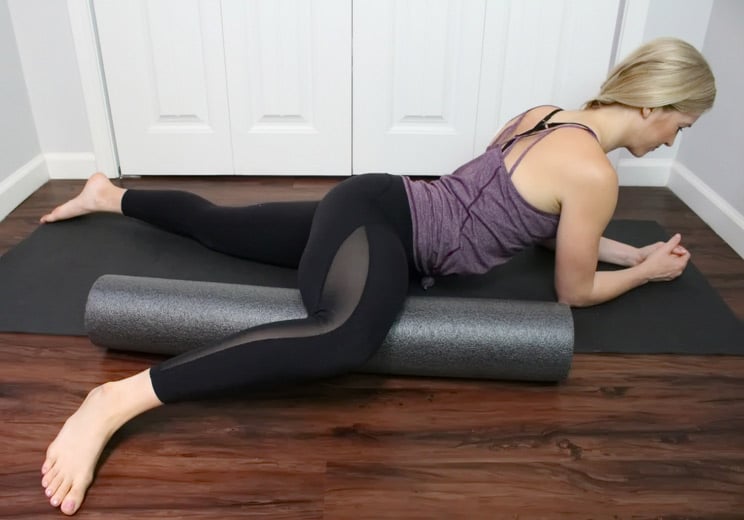
If you do a lot of walking, running, or jumping, chances are that your adductors are tight. The adductors – or inner thigh muscles – can cause tightness in the groin and hips, potentially causing instability in the knees and hip pain.
- Lie next to the foam roller so that it is parallel to the right side of your body. Place your forearms on the ground to support your upper body.
- Bend your right knee and place your right thigh over the foam roller so that it rests right above your knee.
- Slowly begin to roll the foam roller in towards your groin. Stop when you find a tight spot, then continue on until you are right below the groin.
- Roll for about one minute, then switch to your left leg.
IT Band | 2 minutes
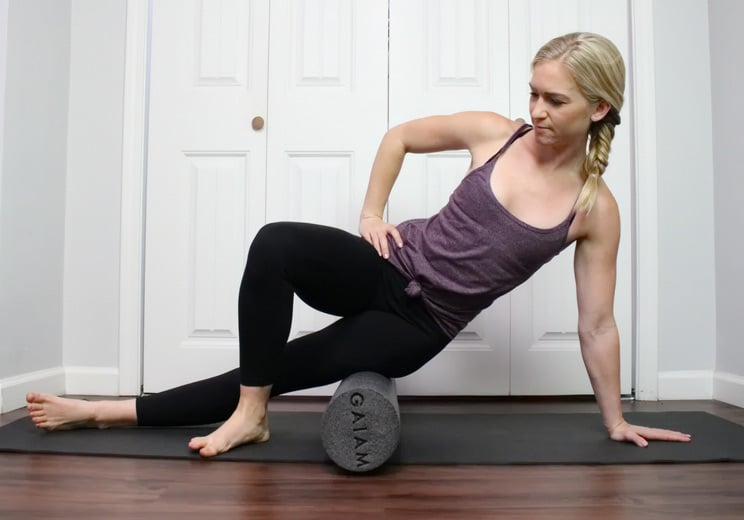
The IT band runs from the outer thigh to the knee, and pain in this area is common among long-distance runners. When tight, the IT band can cause knee and hip pain.
- Start lying sideways on the foam roller so it rests right below your outer right hip.
- Straighten your right leg. Then, bend your left knee and step your left foot in front of your right thigh. Lean into your right palm so that your right arm and your left foot are controlling the amount of weight you are placing on the foam roller.
- Slowly roll up on the foam roller so that it rolls down towards the knee. Stop to hold for 20 seconds whenever you find a knot, then continue on until you roll to right above the knee.
- Slowly reverse and roll back up towards the hip.
- Once you get back below the right hip, switch to the other leg.
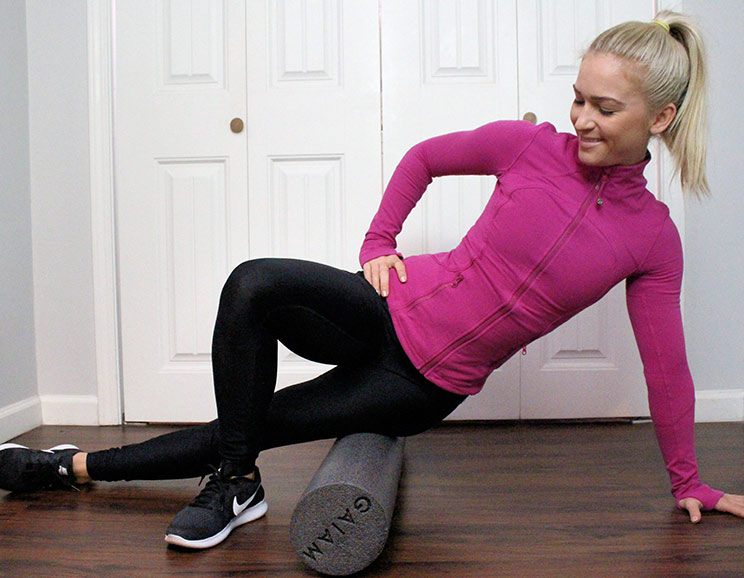
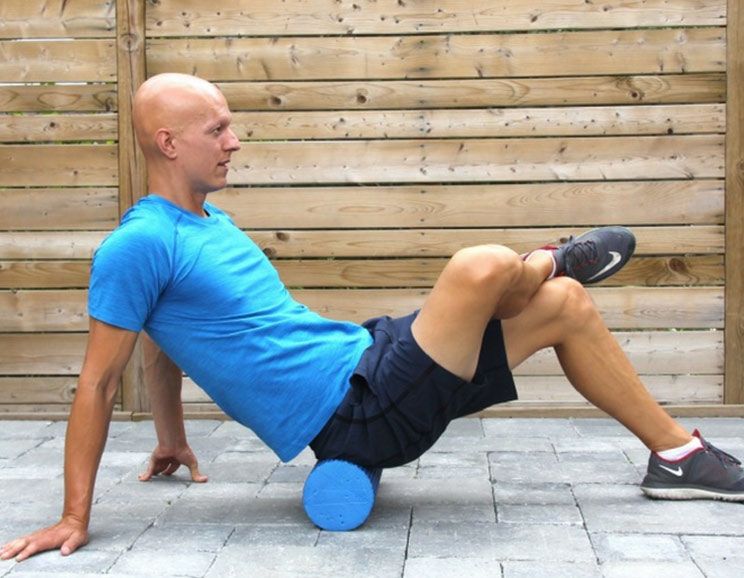
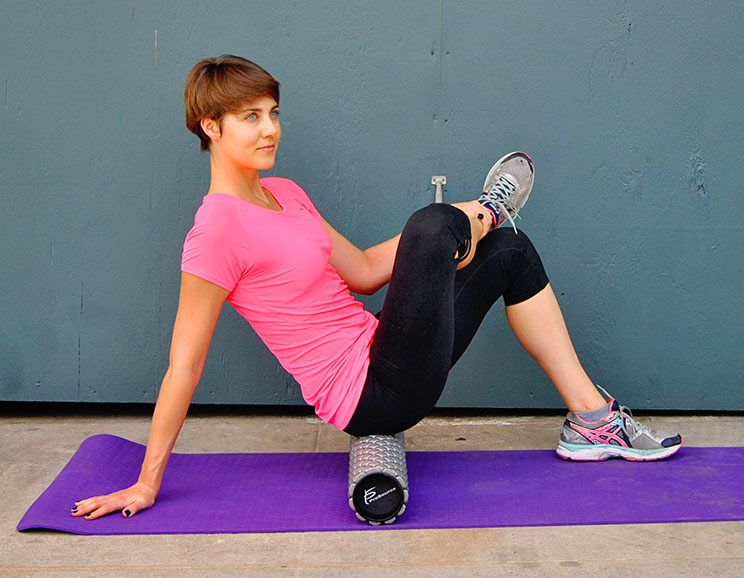
Glutes | 2 minutes
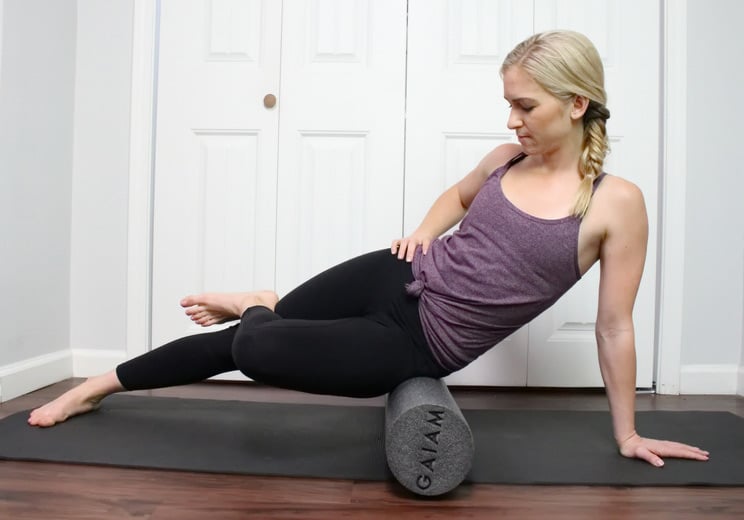
Repetitive movements like cycling, hiking, and squatting can lead to tight glutes, which may cause sciatic pain, lower back, and knee pain.
- Start by sitting up on your foam roller with your knees bent and your feet on the floor.
- Place your left hand on the ground behind you to support yourself and put your right hand on your hip.
- Cross your right ankle on your left thigh right above your knee. Turn your body to the right so that you are applying pressure to the gluteus medius.
- Slowly roll around the area, taking small up-and-down and back-and-forth movements to look for trigger points. When you find one, stop and hold for 20 seconds before moving on.
- Once you’ve completed the right side, switch to the left.
Hip Flexors | 2 minutes
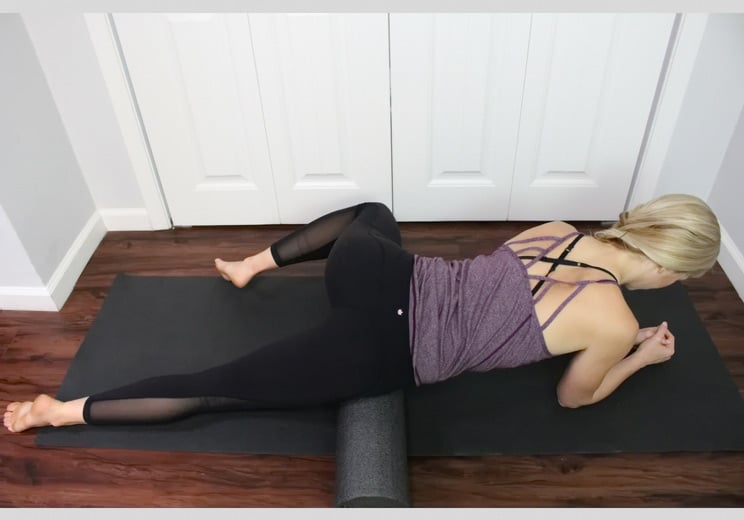
Any movement that causes you to hinge at your hips, such as sitting or running, can quickly lead to tight hip flexors. Your largest hip flexor, the Psoas Major, attaches to your lumbar spine, so when this muscle gets tight, it pulls on your lower back and causes pain.
- Start by lying face down on your foam roller so that it lies underneath and a little below your right hip.
- Bring your left leg out to the side at a 90-degree angle and place your forearms on the ground in front of you to support some of your weight.
- Straighten your right leg back behind you with your toes untucked and begin to take small back-and-forth and side-to-side movements.
- When you find a trigger point, stop and hold it on the spot for 20 seconds or until you feel a release.
- Repeat on the left leg.
Back | 2 minutes

From sitting most of the day to exercise like lifting weights, most of us have back pain at one point or another. Tightness in the muscles of the back can be painful and cause muscles in the hips and neck to also become tight.
- Start by sitting down on the floor with your back against the foam roller. Bend your knees and place your feet on the ground.
- Lean back so that your mid-back is supported by the foam roller, then press into your feet and lift your hips slightly. Bend your elbows and place your palms behind your head to protect your neck.
- Slowly walk your feet away from your body an inch at a time to roll slowly up your back, towards your head. When you find a trigger point, stop and hold for 20 seconds and then continue on.
- Stop once you get right below the shoulders and then roll back down to the starting position.
Tip: Do not roll on the neck or the lower back.
Upper Back & Shoulders | 20 reps
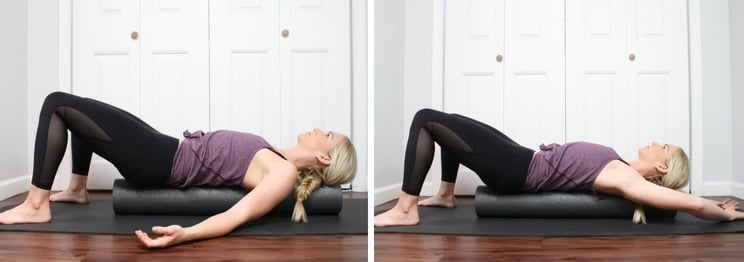
Sitting at a desk all day causes your shoulders to round and your chin to jut forward, resulting in upper back, shoulder, and neck pain. This foam rolling technique helps to increase range of motion in the shoulders and helps to massage out knots in the rhomboids and trapezius muscles.
- Lie down on the foam roller so that it is going vertically up and down your spine, supporting both your hips and your head.
- Bring your arms down alongside your body with your palms facing up. Draw your navel in towards your spine so that your lower back is touching the foam roller.
- Keep your fingertips brushing the ground as you inhale and slowly sweep your straight arms over your head. Pause for a moment at the top to feel the stretch through your chest and shoulders.
- Exhale to slowly sweep your arms back down by your sides.
- Repeat for 15-20 repetitions.
Neck | 2 minutes
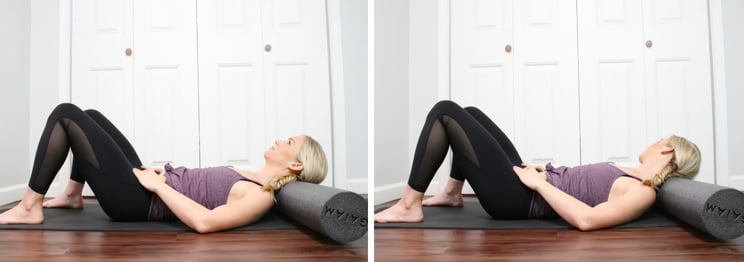
Neck pain is often caused by working at a desk or driving, and sometimes from exercise or just sleeping the wrong way. Neck stiffness can lead to debilitating discomfort and cause pain and tightness the trapezius, shoulders, and rhomboids.
- Start by lying on the ground face up and sliding the foam roller longways underneath your neck so that it supports your head.
- Bend your knees and place your feet on the floor. Then, place your palms face down on your hips.
- Very slowly rock your head from one side to the other. When you feel a knot, stop and hold until you feel a release.

(Your Next Workout: 7 Foam Roller Exercises to Release Hip Pain



 Symptoms of Celiac Disease and Toxic Foods to Avoid

Show Comments